AdGuardHome is an open-source DNS server capable of filtering web advertisements, malicious download links, and trackers through DNS filtering, thereby enhancing the web browsing experience. Integrating AdGuardHome with pfSense allows AdGuardHome to be launched by pfSense, protecting the entire network with its filters.
Contents
Installing AdGuardHome
As of the writing of this log, AdGuardHome has not been included in the official pfSense repository, thus it requires manual installation. Since AdGuardHome is written in Golang and has no external dependencies, it can be easily installed.
Since installing AdGuardHome requires using DNS, the installation of AdGuardHome should be completed before modifying the DNS configuration.
First, install the dependencies for AdGuardHome:
# pkg install ca_root_nss
# pkg install nano
# pkg install sudo
Install AdGuardHome:
curl -s -S -L https://raw.githubusercontent.com/AdguardTeam/AdGuardHome/master/scripts/install.sh | sh -s -- -v
Upon completion of the installation, the pfSense command line will prompt you to log into AdGuardHome through the LAN IP on port 3000 for software initialization.
For the web management interface, choose port 3000 or another unoccupied port. The DNS server listening port can be set to the default port 53, but Unbound’s listening must be disabled. In this document, we continue to use Unbound for forwarding, thus selecting port 5354 (port 5353 is reserved for mDNS and should be avoided).
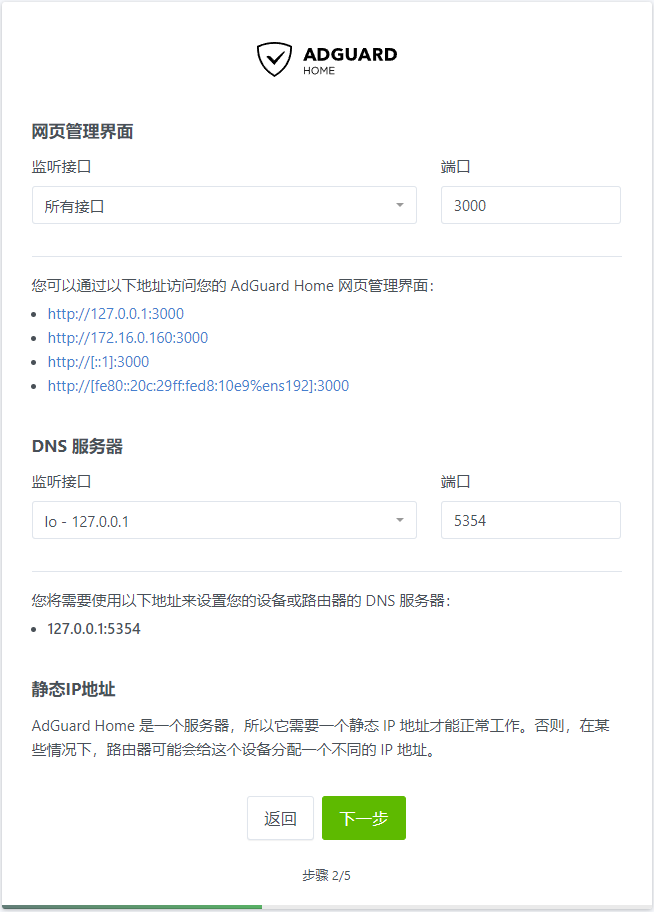
After setting the username and password, the initialization of AdGuardHome is complete.
Configuring Unbound Forwarding
Next is configuring Unbound. In Services > DNS Resolver > General Settings > Display Custom Options > Custom options, enter the following content:
server:
do-not-query-localhost: no
forward-zone:
 name: "."    # Allow all DNS queries
 forward-addr: 127.0.0.1@5354
 forward-addr: ::1@5354
Uncheck Enable DNSSEC Support (mandatory, otherwise, DNS forwarding will not work correctly).
Then set the system DNS server: System > General Setup > DNS Server Settings > DNS Servers
A - 127.0.0.1
B - ::1
Also, uncheck Allow DNS server list to be overridden by DHCP/PPP on WAN.
At this point, the system’s DNS requests will be forwarded to localhost:5354 and resolved through AdGuardHome. You can test whether DNS resolution is working properly using the dig command:
$ dig @192.168.1.1 google.com

; <<>> DiG 9.18.18-0ubuntu0.22.04.2-Ubuntu <<>> @192.168.1.1 google.com
; (1 server found)
;; global options: +cmd
;; Got answer:
;; ->>HEADER<<- opcode: QUERY, status: NOERROR, id: 9854
;; flags: qr rd ra; QUERY: 1, ANSWER: 1, AUTHORITY: 0, ADDITIONAL: 1

;; OPT PSEUDOSECTION:
; EDNS: version: 0, flags:; udp: 1372
;; QUESTION SECTION:
;google.com.                    IN      A

;; ANSWER SECTION:
google.com.             172     IN      A       216.58.206.46

;; Query time: 39 msec
;; SERVER: 192.168.1.1#53(192.168.1.1) (UDP)
;; WHEN: Sun Feb 25 22:56:01 CET 2024
;; MSG SIZE  rcvd: 55
Configuring SSL/TLS (optional): If pfSense is already set up with SSL certification protection, you can enable Enable SSL/TLS Service in DNS Resolver and select the appropriate certificate, thus enabling DNS-over-TLS queries through Unbound.
$ dig @192.168.1.1 google.com +tls

; <<>> DiG 9.18.18-0ubuntu0.22.04.2-Ubuntu <<>> @192.168.1.1 google.com +tls
; (1 server found)
;; global options: +cmd
;; Got answer:
;; ->>HEADER<<- opcode: QUERY, status: NOERROR, id: 27728
;; flags: qr rd ra; QUERY: 1, ANSWER: 1, AUTHORITY: 0, ADDITIONAL: 1

;; OPT PSEUDOSECTION:
; EDNS: version: 0, flags:; udp: 1372
;; QUESTION SECTION:
;google.com.                    IN      A

;; ANSWER SECTION:
google.com.             300     IN      A       142.251.209.142

;; Query time: 44 msec
;; SERVER: 192.168.1.1#853(192.168.1.1) (TLS)
;; WHEN: Sun Feb 25 11:24:52 CET 2024
;; MSG SIZE  rcvd: 55
Configuring AdGuardHome Autostart
Edit the autostart script:
#!/bin/sh
# PROVIDE: AdGuardHome
# REQUIRE: networking
# KEYWORD: shutdown

. /etc/rc.subr

name="AdGuardHome"
rcvar="adguardhome_enable"
AdGuardHome_env="IS_DAEMON=1"
AdGuardHome_user="root"
pidfile_child="/var/run/${name}.pid"
pidfile="/var/run/${name}_daemon.pid"
command="/usr/sbin/daemon"
command_args="-P ${pidfile} -p ${pidfile_child} -T ${name} -r /opt/AdGuardHome/AdGuardHome"

load_rc_config $name
: ${adguardhome_enable:=yes}

run_rc_command "$1"
Grant permissions:
chmod 755 /usr/local/etc/rc.d/adguardhome.sh
Create and edit the startup item:
# touch /etc/rc.conf.d/adguardhome
# nano /etc/rc.conf.d/adguardhome
Add the following content:
#!/bin/sh

adguardhome_enable="YES"
adguardhome_bootup_run="/usr/local/etc/rc.d/adguardhome.sh"
Grant execute permissions:
chmod 755 /etc/rc.conf.d/adguardhome
Reference Documents
https://forums.torguard.net/index.php?/topic/2546-pfsense-adguardhome-with-doq/
https://broadband.forum/threads/installing-adguard-home-on-pfsense.205884/
https://www.openos.org/threads/pfsense-adguard-home-dns.3362/